The date: the 2
nd of November. The task: to push
our beading boundaries.
As novices to the world of bead manufacture, finding ways to
challenge ourselves was not particularly difficult, despite having made glass
beads once before. Looking to our library books for examples of Viking-styled
glass beads, we once again attempted to recreate their colours, shapes, and
designs to the best of our abilities. Taking note of our previous experiences
of unusual blob shapes and exploding flat glass rods, we strove to better our
technique, sharpen our lines, develop our dots, and most importantly, work on
our patience! Needless to say, in a world where practice supposedly makes
perfect, we’re going to need a fair bit more practice.
As our experiment comes to a close, a breakdown of our frets
and frustrations is deemed necessary for the benefit of those who so choose to
take on the creative task of beading making. Consider this fair warning.
The following headings outline the degree of difficulty
observed throughout various aspects of the beading process:
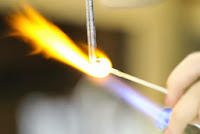 |
| Application of molten glass. |
Level- Easy-ish
- Application of molten glass onto mandrel
- Shaping of a melon bead
- Shaping of a ring bead
- Layering of various glass colours (e.g. green with
coating of clear glass)
Here is a video of a melon bead being made:
Level- More Difficult
- The formation of a dotted pattern (easy to
produce, hard to keep uniform)
- The formation of stringer lines (producing
intentionally straight or spiralled lines requires a steady hand; hard to keep
evenly spaced and uniform)
- Working with lighter coloured glass, specifically
white and yellow (More prone to burning due to light nature of glass. In
addition, the dirty nature of burning propane can add to this affect. Oxygen burns hotter and cleaner, making the overall process more efficient.)
 |
| Failed stringer attempt (one glass rod cracked) |
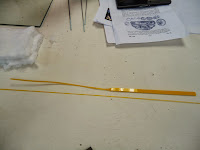 |
| Successful stringer attempt. |
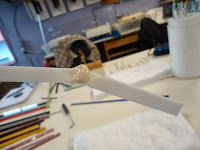
Production of single/multi-coloured stringers
(timing and patience is key!
One has the tendency to either move too slow or
too fast when pulling the glass, easily causing breakage).
Making a multicoloured stringer:
Level-
Getting
Harder…
- Shaping of conical bead (construction process is
relatively simple, but uneven distribution of glass onto mandrel makes it fragile
and subject to breaking during the cooling process)
- Shaping of quadratic beads, or beads with a
straight edges (molten glass resists sharp edges, typically rounding off as it
is heated)
- Shaping of collared bead (keeping the bead symmetrical
proves challenging. An additional difficulty is keeping colours of the main
bead and the collared portions of the bead distinct, as they want to fuse).
- Shaping spiralling beads (consistent thickness and evenness of spiral proves challenging. This shaping technique also has the tendency to extend beyond the length of the mandrel, sealing off one end of the bead).
Level- Maybe Reconsider
What You’re Doing-
- Checkerboard pattern (incredibly difficult,
requiring the ability to control, with accuracy, the amount of glass placed
onto the molten bead).
- Creation of chevron pattern (the combination of needing
straight lines, a steady hand, and even temperature often causes this pattern
to misshapen the bead’s design beyond repair).
 |
| Attempt at chevron. While not successful, it is still very pretty. |
Overall, it’s notable to mention that the exact replication of
Viking styled beads is a task in and of itself. We found that recreating a
basic pattern (such as dotting) was simplistic in that it gave us the freedom to
place the designs where we desired, but mimicking exact placement of lines,
dots, and waves was virtually impossible. Learning how the glass reacts to heat
and movement is key to predicting and controlling what will happen throughout
the process of creating a bead. Knowledge of the properties of glass is of
paramount importance to becoming a successful craftsperson in this field.
Keep calm and bead on.
Here is a video of a bead being removed from the mandrel (this was an easy one!):
Here are some photos from this session:
 |
| All ready to start making beads! |
 |
| Clamping tool. We did not have this in our last session. |
 |
| Oxygen torch. Burnt much hotter and cleaner. Probably more akin to Viking fire-working. |
 |
| Another beautiful stringer by Krista! |
 |
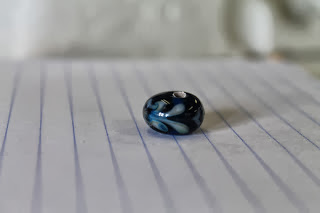
| Taking the bead of the mandrel. Delicate process. |
 |
| Success! |


No comments:
Post a Comment