Friday 15 November 2013

Conclusion: Final Thoughts

Angela:


Overall this experience has been extremely illuminating  for me. It had both expected and unexpected results. I expected my joints to give me some problems in the actual beadmaking, but I did not expect this to be more so with the bead removal. I expected that I would not be making professional grade beads, but I neither anticipated how difficult seemingly simple designs would be to do, nor the time it took to actual learn how to them even marginally well. Beadmaking today differs only in minor respects to beadmaking in the Viking Age, and this speaks to how effective the methods used were in that time.
I had a lot of fun doing this experiment, partly because of the task, but largely because of the great group of people I was working with (thanks guys!). Through working together we completed what we set out to do: make glass beads and in that process ponder and successfully answer the three research questions we came into this project with. One question that I have wondered about a lot throughout this project is can just anyone have made beads in the Viking Age? The answer to
this, as Krista stated in the previous blog, is yes (presuming they have access to the materials). However not everyone could have been a beadmaker, and I am living testament to this. My minor health issues would have been major obstacles for my success at becoming a beadmaker in the Viking Age. While my final beads show that I am capable of making beads (albeit a bit sloppily), my joint issues in particular prove that I could never be a beadmaker (not without serious pain issues anyways).

Krista:


I have really enjoyed the whole beadmaking process, and I am glad I was able to do this project. And, as Angela said, a large part of this was because of the group. It would not have been as fun alone, so thank you for sharing this adventure into beadmaking! It was really great to research and explore Viking glass beadmaking, and I loved to see all of our attempts and successes throughout this project.

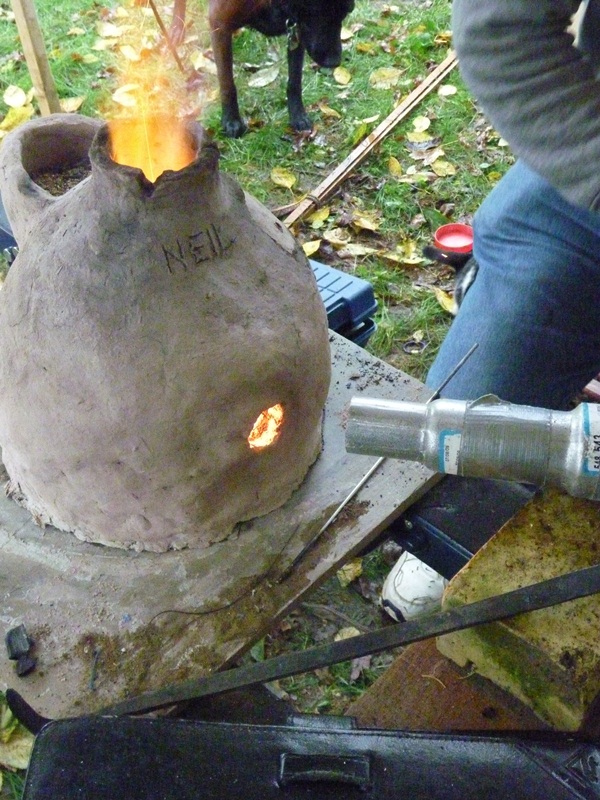
When I first thought of what we would be doing for this project, I thought we would try to create glass beads in a Viking Age furnace, as close to authentic as possible. Very quickly I realized the reality of making our own furnace was going to be way out of our reach! I think if we had had more time and unlimited resources, I would have loved to include this as part of the project, to actually be able to test the difference between the two techniques. What surprised me though, was that the modern way of making beads is not actually very different in terms of what methods are used. For the scope of this project, with focusing on recreating designs and shapes of Viking beads, using modern techniques was more doable and allowed us to focus on really understanding how to create glass beads.

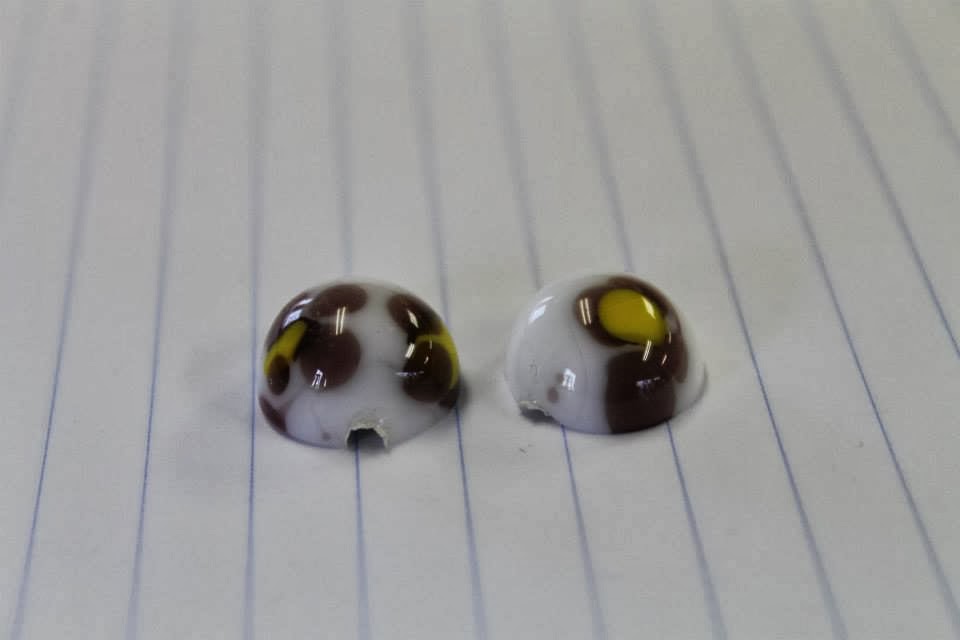
I think if I was going to do this project again in the future, I would definitely do more sessions at the workshop. Making beads is a slow learning curve and I would have liked to have gotten good enough to recreate some more difficult designs. For this project though, I think the two sessions were enough to understand the process of beadmaking and answer our research questions. But, because of this project, I definitely want to continue making glass beads. I have really enjoyed the challenge of creating different shapes and designs!


Rose:

This project has taught me a lot about Vikings that I feel I would not be able to learn in any other way. By recreating the beads, we experienced some of the challenges and successes that their original manufacturers would have faced. This is definitely a different way of learning, and it is extremely effective. Not only did my group members and I learn an interesting skill, we have our own experience to compare to what we are researching.

For areas of future research I would try to recreate whole necklaces that were found on sites such as Birka or Ribe. I would do this because it is important to acknowledge that individual beads are significant, but they are not the end product. Making the necklaces would demonstrate the value of the beads as a whole. It would be interesting to compare the differences between making individual beads, and making beads to be kept together as a group.

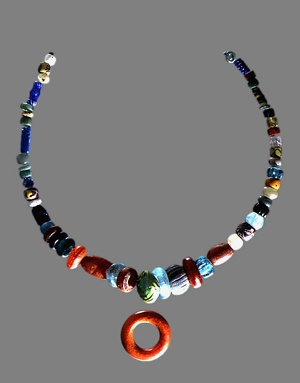
The Pagan Lady's Necklace
                                                    
If I were to do the project again, I would try to test different ways of making certain bead shapes. This would contribute a lot to the discipline of Viking archaeology because I did not find a lot of research on how they made the individual shapes. This would also be a challenge, because there would not be a lot of research to compare our results with.

I would also like to thank my group for everything! It has been a pleasure.

EMMA:


Overall this experience has been an eye-opener to the intricate world of glasswork, providing both expected and unexpected results, as well as introducing me to the world of the Vikings in a way I could have never imagined. By recreating beads I was able to experience some of the difficulties a Viking Age beading apprentice may have endured while learning a new craft, while also having the satisfaction of learning (and in some cases succeeding) how to produce a functional work of art through a hands-on engagement with its more primary materials. My interest in glass bead making was certainly fueled through the encouragement and positivity emulated throughout the group, making the beading learning curve more of a fun activity, rather than a challenge to be endured.  


If I were to approach this project again, I would like to have more statistically significant figures drawn from our beading sessions to identify potential trends that may have otherwise gone unnoticed. For example, the documentation of the ranges and individual sizes of each of our group member’s beads from either session, in comparison to the number of broken beads resulting from inadequate cooling, would help to correlate the tendency of breakage to smaller or larger beads, if in fact a correlation does exist (this would inevitably allow us to better understand more specifically why many of our beads broke). Additionally, the melting temperature of the torches, the varying viscosity of the different colored glass (which is often found on its packaging) and so on, would be significant for the purpose of replication of this experiment by others. 


As many fields in the social sciences are often ridiculed for being more assuming and less ‘evidence based’ (or as I have once heard, “not a real science”…. which is SO entirely untrue), I feel it noteworthy to include comparable statistics for experiments such as this to further identify discrepancies, compare to other previous experimental research, and legitimize our findings.

Finally, I  would like to thank my fellow group members for their wonderful participation in this experiment- no scalding, cuts, or burning hair! That's an achievement in and of itself- job well done ladies :)


Monday 11 November 2013

Research Question #3

In this blog post, we will answer our third research question:

What degree of manual dexterity is required to make beads? Can just anyone do it, or would you be required to have relatively good health?


Rose:


The degree of manual dexterity required to make beads is very high. Not only is the bead maker required to be able to move their hands in certain ways, but they have to have high endurance. A bead maker would probably make beads for hours on end, so they would have to be healthy. One of the most difficult hand movements was turning the mandrel at a controlled rate when applying the glass. This was especially important for making spiral beads, because once the glass was applied the spiral shape could not be improved. The most difficult aspect of bead making in terms of health is removing the beads from the mandrels, which Angela described in her reflection piece. If someone had joint pain or arthritis, it would be extremely difficult to produce a significant number of beads and it would be almost impossible for them to remove them from the mandrels. All of our arms got tired as well, and we rested our elbows on either side of our propane torches. Since Vikings would have used small kilns (seen below), they might have not had a place to rest their arms. 
large pic
Reproduction of a Viking Kiln for Bead Making
In terms of overall health, vision is also important. Small detailed patterns that are a part of the most striking beads (as seen below) would have required good eyesight. 

Viking Glass Bead Necklace include Millefiori Glass Beads in the Center


Therefore, a bead maker would have to have relatively high overall health in order to successfully and continuously manufacture glass beads. 


Angela:


As Rose mentioned, manual dexterity is of utmost importance in beadmaking. This is particularly true when it comes to designs. If someone does not have a high degree of control over even the minutest of movements their hands make while creating the design, some kind of flaw will result, and once the molten glass has been applied to the bead, there is no fixing it. Someone with relatively good health, but with a problem as small as shaky hands, would probably not have been able to be a glass beadmaker. The details seen on some Viking beads are so fine and minute, that there really is not any room for mistakes. Here are some examples of highly detailed beads that illustrate the fine detail I am taking about (note: some of these are reproductions of exact Viking beads, and not the originals): 


Copyright All rights reserved by fireseed
http://www.regia.org/life/glass.htm

http://www.vikinganswerlady.com/graphics/pagecontent/eyebeads.gif


Note on the last picture how many layers of 'eyes' are on the centre bead (I have counted 6). This would require the ability to place a dot of glass on the same spot precisely six times. That is a great degree of precision and manual dexterity. Also notice in the pictures above, many of the fine lines that are present on the beads. While applying a glass stringer to a bead seems relatively basic, it requires not only a steady hand, but also the control required that will dictate how thick or thin the line is.  Again I wish to mention the Viking bead found that had an image of a person (itself a difficult design), wearing that same bead. This image is so finely detailed that the bead made on the bead showed many of the same designs, thus being able to be identified as that bead. The amount of skill, fine maneuvering  and precision this would require is just immense. This kind of manual dexterity could only be had by someone who has great health. I find myself to be a pretty healthy person, but even the issues I face (joint pain, slightly shaky hands, need for glasses), would likely have prevented me from being a master beadmaker in the Viking Age. 
   

Emma:  


Application of fine details, including that of lines, dots, and other various designs require both concentration and considerable control over one's body. Maintaining a degree of stability to allow for the development symmetrical designs and shapes requires the craftsperson to reduce the amount of shaking present in their hands and arms (which becomes significantly more challenging the longer the individual is engaged in the bead making process, due to exhaustion), while also monitoring unwanted movement resulting from breathing.


Having proper posture is an additional requirement for glass bead production, as a bent back and downward-curved neck creates bodily strain that would likely eventually result in fewer beads being produced per session, and likely even a shorter bead-making career as permanent injury would likely ensue. Careful consideration of one’s physical well-being is certainly a factor in bead-making, as even asthma in the presence of kiln use would be detrimental to becoming a master craftsperson due to soot and smoke being waste products of the process.

An example of proper posture. A straight back allows for more productive
work, as less strain in imposed on the body.


With the above considerations, in combination with my other group members’ observations, dexterity and health is of substantial significance to the production of quality beads. Illness or frailness would likely have been factors limiting those of the Viking Age to the rolls of assistants and common craftspeople, rather than masters.


Krista:


I would have to agree with Rose, Angela and Emma. The manual dexterity needed to make beads is very high. It is important for a bead maker to be able to use both hands for possibly hours at a time, constantly turning the mandrel and possibly creating designs, which all require a steady hand. Good health is also an important factor, especially in the hands and arms. Weak muscles, bones and/or joints in the hands/arms, or even hands/arms prone to injury (such as tendinitis), would not be good for a beadmaker. Beadmaking takes a lot out of the upper body, from holding the mandrels and glass rods/stringer to maintaining your posture to prevent a bad neck/back (as Emma pointed out). It is also important to remember that the Vikings would have been using a furnace that they would have had to feed oxygen to with bellows. If they did not have someone else to work the bellows, they would have had to do this as well to constantly keep the oxygen flowing (to maintain the correct temperature). This means they would have to have strong legs!

As we have proven, anyone can attempt beadmaking and be successful at making nice glass beads (if I do say so myself!). But, it would be hard for a professional beadmaker to have low manual dexterity or poor health in the hands/arms and be successful. Would just anyone be able to make glass beads during the Viking Age? Probably, if they had access to a furnace, glass, tools and instruction. But, to be successful one would have to have good overall health, and great manual dexterity. 


Saturday 9 November 2013

Research Question #2

In this blog post, we will answer our second research question:


How much effort is used in the manufacture of different beads (ranging from simple to elaborate in design and shape)?


Krista:


One of the definitions for the word effort is a "strenuous physical or mental exertion." Glass bead making definitely fits this definition, and takes a lot of effort. On the surface, it does not seem that making glass beads is either physically or mentally strenuous, but once you actually sit down to make a few beads, you discover that it takes hard work and patience. 

The repetitive movement involved in turning the mandrel really wears on your hand and arm. As has been said before, we all had to rest our arms on the table at some point while we were making beads. It takes a fair amount of time to form even the simplest, one colour, ring-shaped or round bead. I would estimate at least 10 minutes for this type of bead. One would think, in a day thousands of simple beads could be made (at 10 min each). But, you have to factor in the physical strain on the body. We only made beads for approx. 3 hours at a time, and by the end we were all tired. Granted, we are not professional bead makers, but still one could image that even a professional bead maker could only work on a certain amount of beads a day. And, there was always a chance the beads would not survive the cooling process. In our two 3 hour sessions, I made 10 beads the first time (with only 4 surviving the cooling process completely intact, and 2 partially surviving) and 15 beads the second time (with 9 surviving the cooling process completely intact, and the 3 spiral beads all partially intact). Of course, factoring in the more elaborate designs, a bead maker could probably spend hours on just one bead, and the physical and mental effort would increase enormously. Bead making is not a process that can be rushed, which leads to the mental effort needed for bead making.

Bead making was mentally strenuous due mainly to one thing - Patience. Patience was a key factor at our bead making sessions. You cannot rush bead making for one very simple reason: you cannot make the glass heat faster and it is very hard to fix a mistake once the glass has fused. You have to heat the glass rod at a slow and steady pace, if you try to heat it too quickly it can crack or shatter, and you have to start again. Forming the bead in the flame takes time as well, as the glass slowly comes together. In the videos from the second experiment (found in Take Two and Take Two Reflection), we sped up the videos so that the viewer could see the whole process in approx. 2 min. Originally, the times were closer to 10 or 15 minutes per attempt. When creating designs on the beads, you need to be patient enough to lay down the designs just right, because it is very hard to go back and fix something once the glass has fused together.


These are three examples from the second bead making sessions of both the hard work and patience needed to create beads, and the disappointment felt when they do not survive the cooling process. I put a lot of effort into each bead, both in the design and shape. In the two round beads, I tried complicated designs (at least, complicated for me). But, as you can see my designs were not perfectly placed. This is partly due to inexperience, but also due to unsteady hands because of physical strain and rushing the design. The rectangle bead was a hard shape to accomplish because it is hard to get straight lines/corners with glass (because it is constantly wanting to go round when heated). As you can see in this bead, I rushed the finishing and did not make sure one of the sides was flat (the top of the front bead-half is slightly rounded and not flat like the back bead-half). It was very disappointing when these beads broke because I had put so much effort into them:
purple and yellow 'flower' design
Rectangle shape
blue and white 'eye' design


Rose:
 
As Krista noted, effort can be explained in terms of physical and mental exertion. This research question can also be approached by elaborating on the idea that an artifact’s value is linked to the amount of effort it takes to manufacture that object. In other words, an object might look impressive in the archaeological record, but it might not be that valuable to an individual because it was so easily made. For instance, arrow heads look impressive, but an experienced flintknapper can make one in about 5 minutes. However, bone tools take hours to make. Therefore, the amount of time and effort put into an object’s manufacture can be linked with how valuable it is. If something is demanding to make, it is probably more valuable to an individual. Even though it seems like common sense that a more elaborate bead is more valuable, there is more to it than that. For instance, there could also be a shape of a bead that looks simple but is actually really hard to make.

It is important to connect the term 'effort' with the term 'valuable' with regards to this research question in order to understand the bead making process in a Viking context. By considering the beads as valuable, we can start to ask ourselves what values the Vikings would have placed on different beads. This is significant because it ties into Viking status display.

We grouped types of beads into categories from easiest to hardest to manufacture in our post: Take Two

In addition, here are some examples of beads that I made and reasons why they might be considered valuable to Vikings or not:

Melon Bead
  The melon bead was made by pressing a small pick horizontally into a ring bead four or five times. Initially we thought this bead would be very difficult to create, but it turns out to be a simple, quick shape. The above example shows that the shape can be off center if the bead is done too quickly. However, with patience the bead is done very easily. Since this type of bead would not take much time or practice,  it would probably not have been extremely valued as a bead shape due to the effort put into its manufacture. It is important to note that perhaps certain shapes had symbolic meanings as well, which would increase their value. This is unfortunately not something that we can research in this project, but it is interesting to think about. Keeping to our assessment of value in terms of effort in manufacturing the beads, we placed this shape in our easiest level.

 We put the spiral bead into our 3rd level of difficulty (out of 4 levels with 4 being the most difficult). This bead takes the least amount of time to make, but it takes mental focus and lots of practice. Out of three attempts, this was the only spiral bead that I made which did not break. While I feel like I did become a bit better at applying the glass to the mandrel for this shape, I also feel like I was very lucky. It would be difficult for me to replicate this bead exactly. It is very easy to apply the glass unevenly, and to apply too much glass at the end of the mandrel (which closes off the one end of the bead). However, experienced Viking bead makers would have made so many of these beads that they would have known the exact timing for applying to glass. While this bead is very valuable to me in terms of effort, I have to acknowledge that it was probably less valuable to Viking bead makers. The effort put into making this bead would be in learning how to apply to glass and concentrating through the bead's construction. Once they had achieved that knowledge, these beads could be made in as little time as a minute.


Chevron Pattern Attempt
 The design of this bead is an attempt at the chevron pattern. Raised lines were added on a ring bead, and the whole bead was heated until the lines smoothed out. Then the small pick tool was used to drag a line down the center of the bead. I would consider this technique to be very valuable to the Vikings because it requires multiple glass colours, precision, time (maybe upwards of ten minutes depending on the number of colours), practice, and mental stamina. One wrong move on this bead will completely ruin the pattern. For these reasons we put this design in our most difficult category.
The two outside beads illustrate an ideal chevron pattern.
http://www.vikinganswerlady.com/vikbeads.shtml

In conclusion, while the value of individual beads varies, the overall bead making process requires a lot of effort to learn and complete on a consistent basis.

Angela:

Rose and Krista have both made excellent points. Beadmaking is both mentally and physically strenuous. Although different beads require different amounts of effort, the overall effort is still fairly high and it is likely that this made them the highly valued pieces of jewellery that they were in the Viking Age (Carlsson 1997). I wish to contribute one physical aspect and one mental aspect regarding the effort of beadmaking that I encountered in addition to those mentioned above.  

One aspect regarding effort that I would like to talk about is the slow process of actually learning how to make beads. As I pointed out in my “Reflections on Beadmaking: Take Two” post , beadmaking has a slow learning curve. We were all a little disappointed in our expectations of being much better at beadmaking the second time around. Learning how to make the beautiful and complexly decorated beads seen from the Viking Age would have taken an immense amount of time and effort. Although I cannot find a picture of it, one bead found has an image of a person wearing that same bead, among other designs on it. The amount of finite detail and skill this would take is absolutely astonishing (particularly to
My lack of patience resulted in this half ring, half
spherical bead. Note how it is rounded on top,
yet sits flat on the paper. I seriously did not even
notice this until it had cooled, revealing both
my inattention to detail and impatience
issues.  
me as I have yet to master a wave pattern). After six hours of practice between two sessions, I was only marginally better at creating a wave design and still had difficulty creating thin stringer applications. As Krista mentioned, patience is key, and with my second session I found I actually had less of it than in the first session. I think this may have to do with the fact that my expectations of skill were not meeting the reality and I was getting tired of producing sub-par beads. However, this lack of patience was also a cause of my production of sub-par beads (see above picture). A vicious mental struggle I must say. Thus, the mental effort expended in not only making the bead, but also getting over your lack of ability to create beads at the level you wish to, is far greater than I anticipated. This mental effort regarding the slow learning process was definitely something I struggled with, and the effort required in just learning how to make a bead well is very high.

One physical aspect of beadmaking that really surprised me was the physical strain caused from removing beads from the mandrel. I anticipated joint pain in the actual process of beadmaking, as Youtube videos illustrated well the constant rotating of the molten glass that is required. However, I did not anticipate the level of joint pain that removal caused. Below is the video of me removing a bead. As mentioned in the "Take Two" post, this particular removal was one of the easiest beads to remove. However, you can still see the constant twisting motion that is required to take the bead off the mandrel. Some beads took around 5-10 minutes of constant twisting to remove. While I am prone to joint pain and this certainly factored in, the other group members also mentioned that this particular task caused them pain. Overall, the degree of effort that just removing a bead from a mandrel required, was far more than anticipated.  


The entire process of beadmaking, from learning how to do it, to honing skills, to the actual beadmaking process, and finally to cooling and removal, is a very long one. In total we spent about 6 hours just making beads that did not always survive the cooling and removal process, which took even more time. What seemed simple at first (e.g. that ever elusive perfect wave design) was quickly shown to be not so simple, and other designs were shown to be simpler than they initially looked (i.e. the melon bead). Teaching oneself patience and the ability to discern and work with the properties of glass is a long and difficult process. Ultimately, our experiment illustrated quite well the extensive overall effort, both mental and physical, that goes into making beads. 

Thursday 7 November 2013

Research Question #1

In this blog post, we will answer our first research question:


What techniques and materials were used throughout the Viking Age in the production of glass beads? And, in what ways do modern bead production techniques and materials reflect and/or differ?


Because this was an important issue for our experiments, we briefly went over the main differences between traditional Viking bead making and our bead making in Take One. In this post, we will go more in depth to answer the question, using further research and experience from our bead making sessions. 

Rose - Tools for Bead Shaping

To make beads in a variety of shapes we used tools such as clamps, a paddle, and a raking tool. These tools would help us make straight edges or indentations for melon beads. Through our research we tried shaping beads in several different ways to replicate the Viking beads. We found that some tools worked better than others. For instance, to make a square bead, the clamps worked better than the paddle. The Vikings must have used similar tools, or tools that served the same function. The only evidence we have found for tools in our research to date are the impression of tongs on unperforated beads from various sites and the use of metallurgical crucibles for melting glass at Helgö and Paviken in Sweden (Lundström 1976:10-11). Other than that, we have found no other examples of Viking shaping tools in our research. It may be that they were not preserved, or were described as metalworking tools, as the crucible example suggests.


Krista - Heating the glass

In many ways, the techniques of glass bead making has not changed since the Viking age, though technology has meant that materials and certain methods have been altered. From the research I have conducted on Viking glass bead making, there were two ways the Vikings heated their glass: 

1. In a small clay furnace
2. Over an open flame 

Videos of both of these ways can be found in Take One. This is much different than what is used today, a propane torch, and of course means that some fundamental things would be different: 

Control over flame - When using a torch, the flame is automatically constant because you have control over the torch. The Vikings would have had to use a bellow to maintain a constant flame, and therefore this is another thing they would have had to worry over while making the bead - keeping the fire hot enough to melt the glass and at a constant temperature to make it easier to work. 

"dirty-ness" of flame - When we were using the small torches, they burned 'dirty' - and by this I mean they drew in oxygen and carbon dioxide from the air and made it easier to 'burn' or 'dirty' the beads. We were able to use a torch that was run on propane, but also oxygen - so the flame pulled only oxygen and therefore ran 'cleaner' and hotter (because you could control how much oxygen the flame received - the more oxygen, the hotter it was able to go). The Vikings, using a fire, would have just been pulling oxygen from the air and so they probably would not have had to deal with the 'dirty-ness' we did. This does not mean that burning the glass would have been impossible, as getting the fire too hot would have achieved this, but I think it is more likely that the fire would be too cool - making the glass heat improperly. 

Somewhere to rest arms - One thing that came up in the course of our experiments was that our arms got tired. With a small torch attached to a table, it was easy to rest our arms on the table when they got tired. The Vikings would not have had this luxury. We will discuss this more in Research Question #3.


Angela - Clay, Mandrels, and Punts


A few other minor differences in our techniques and those that the Vikings used are the composition of the clay we used, our use of steel mandrels, and that we did not use metal punts for the actual beadmaking (although Krista did use one for making stringers). 

The clay we used is called "Super Blue Sludge" and while I cannot find the ingredients of it, that it is blue, and referred to as sludge instead of clay makes me assume that it is not just clay. It also has a pretty thin consistency that suggests it is not just clay. Although Vikings would have used naturally
The mandrel in the forefront has natural
clay on it.
http://www.vikinganswerlady.com
/vikbeads.shtml
occurring clay (Ward 2013), our use of  "Super Blue Sludge" did not alter the purpose or results of the clay. It served the same purpose of preventing the glass from sticking to the mandrel, just as naturally occurring clay would. However, one difference may lie in the difficulty of removing the clay from the bead once it has cooled. To remove the substance we used, a diamond bit is needed to scrape it off. The Vikings would have used a brush or pick to remove the clay used on their mandrels (Ward 2013). 


Viking bead still on the mandrel.
http://www.vikinganswerlady.com/vikbeads.shtml

Stainless steel was not available when the Vikings were around, and they would have used simple iron mandrels. In speaking with some of the employees at the glass shop we made our beads at, we discovered that iron mandrels make the glass more likely to stick, and this is why stainless steel mandrels are used. Again, despite the material being slightly different, our mandrels served the same purpose. Even if it was more difficult for the Vikings to remove beads from iron mandrels, this seems to have been dealt with well with the clay they used. 

A metal punt is used instead of a glass rod when beadmaking is done within a closed kiln, much like the kiln in the first video on our "Take One" post. Because our technique more closely mimicked beadmaking over an open kiln, like the second video in the "Take One" post, it was not necessary to use a punt, and glass rods worked best. Using a punt would likely result in slightly different working techniques being used, as it acts as an intermediary between the mandrel and the molten glass, but I feel that it would change the experience fundamentally. 
A metal punt is used here to apply the molten glass
to the mandrel. 


Bibliography

Lundström, Agneta. 1976. Bead Making in Scandinavia in The Early Middle Ages. Stockholm: Almqvist & Wiksell International. 

Ward, Christie. 2013. "Viking Beads and Necklaces." The Viking Answer Lady. Last Modified November 8, 2013. http://www.vikinganswerlady.com/vikbeads .shtml.

Tuesday 5 November 2013

Take Two Reflection

My station - ready to do some bead making!
This is my reflection post for our second day of experimenting with glass bead making.

My focus this time was to continue practicing different shapes and designs, including replicate at least one viking glass bead bead from one of the sources we have been looking at. I also wanted to successfully make some stringers, as my attempt last time failed miserable.

I tried my hand at making spiral beads, which I had not tried last time. I was fairly successful, but none of them turned out perfect. It was really hard to control the glass rod enough to create a consistent spiral. On my first one, I also made the mistake of going over the end of the mandrel and I was very lucky that I was able to push the glass back (using tools and gravity). These are my attempts:
1st attempt - Purple Spiral Bead
2nd attempt - Purple Spiral Bead
3rd attempt - Blue Spiral Bead

I was able to make three successful 'replica' beads, but these were very simple in design:
Green with yellow dots Round Bead
Green Ring Bead
Blue Round Bead


I found it really hard to recreate a more complicated design, and my attempt is not very good. I tried to do a black cylindrical bead with white dots and a cross (X) pattern between each dot. My lines were not very good, I found it really hard to control the glass rod enough to make a straight line that was perfectly placed, and I also had a problem with the lines staying, as they had a tendency to 'melt' in the centre and create two dots at the beginning and end of what was suppose to be a line.

One line made it, but the other 'melted' to the sides


I was more successful at making stringers. I attempted two separate processes. The first way was one I had attempted at our last session. I took two rods of the same colour (yellow) and pushed them together until they formed a 'ball' in the centre. I was then able to pull this ball until I had a very long yellow stringer. This was great, because we did not have any yellow stringers available, so we were all able to then use the yellow stringer for detail work.
Yellow stringer in front, can see original rod
(with part of stringer which broke off) in back

(Jensen, 1991, pg 38)

The second way I made stringers actually came from The Vikings of the Ribe by Stig Jensen (left). I used a steel mandrel without the clay solution on it, coated it in one colour and then created two lines with another colour. After this was fused together, I took the glass out of the flame and attached a stainless steel pick (not a tweezer like is shown in the example because I did not have one on hand), which stuck to the glass. I pulled the glass while twisting the mandrel. This created a spiral pattern. As I pulled, the glass became harder to pull until it broke off at the origin (see pictures to the right). 

I tried blue & white (like is shown in the example) as well as green, black & blue (right) to try the technique will more than two colours.


I then attempted to recreate the bead shown in the example (left, top of the picture). This was not very successful. I tried three different attempts, but none of them fully turned out.

Here is a video of me making a blue & white stringer, then attempting to recreate the bead. This was my first attempt of the stringer and the bead. You can see a picture of the finished bead below ("1st attempt" beads).


These are the beads I made with the blue & white stringers:
1st attempt - from top
1st attempt - from side
2nd attempt
3rd attempt


These are all of the beads I made:


As you can see, like last time, not all of them made it intact. I tried another rectangle bead and two round beads with dot designs (one of them a flower design with the dots), which all broke in half as we were taking them off the mandrel.

I think this time around I was very successful at making stringers, which is really great. I was also able to get more comfortable with dots, but I am still really bad at lines. This is definitely a craft that requires a lot of practice before one become really good. I have enjoyed making glass beads though, so going forward, I think I will continue to make beads and hopefully get better!